Mybatis源码学习(二):Mapper接口的绑定

概述

根据上一篇文章,我们了解了 Mybatis 的配置文件是如何被加载的。在完成这一步之后,Mybatis 还需要根据配置文件中指定的路径去加载 Mapper 接口与写有 sql 的相应映射文件,最终完成两者的绑定。

在本篇文章,我们将结合源码阐述这个过程。

这是关于 Mybatis 的第二篇文章,前文:

Mybatis源码学习(一):配置文件的加载

一、加载接口

image-20210609000011106

1.XMLConfigBuilder

见名知意,这个类的作用在于解析映射文件,根据上文,我们会了解到他里面有各种 标签名+Element为名的解析方法,其中,针对 Mapper 映射文件解析方法就是mapperElement()

在开始之前,我们需要知道,在映射文件中有四种指定 Mybatis 接口的方式:

1
2
3
4
5
6
7
8
9
<mappers>
<!--需保证接口与xml同包同名-->
<package name="com.huang.read.base"/>
<mapper class="com.huang.read.base.PersonDao" />

<!--不需要需保证接口与xml同包同名-->
<mapper resource="com/huang/read/base/PersonDao.xml" />
<mapper url="C:\document\GitProject\mybatis-3\src\main\java\com\huang\read\base\PersonDao.xml" />
</mappers>

这决定了获取在XMLConfigBuilder中解析 Mapper 映射文件的方法mapperElement()会有四种不同处理逻辑:

1
2
3
4
5
6
7
8
9
10
11
12
13
14
15
16
17
18
19
20
21
22
23
24
25
26
27
28
29
30
31
32
33
34
35
36
37
38
39
40
41
42
43
44
45
private void mapperElement(XNode parent) throws Exception {
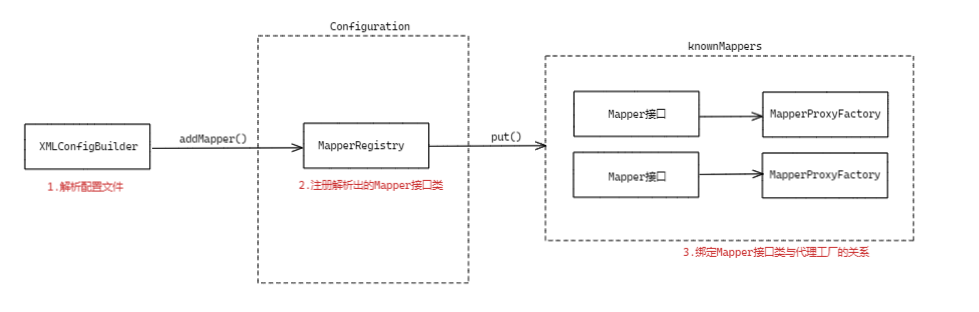
if (parent != null) {
for (XNode child : parent.getChildren()) {
// 1. 如果是通过package标签配置整包扫描
if ("package".equals(child.getName())) {
String mapperPackage = child.getStringAttribute("name");
// 注册扫描到的接口
configuration.addMappers(mapperPackage);
} else { // 如果是通过mapper标签配置

// 获取标签上的resource、url和class属性
String resource = child.getStringAttribute("resource");
String url = child.getStringAttribute("url");
String mapperClass = child.getStringAttribute("class");

// 2.使用resource
if (resource != null && url == null && mapperClass == null) {
ErrorContext.instance().resource(resource);
try(InputStream inputStream = Resources.getResourceAsStream(resource)) {
XMLMapperBuilder mapperParser = new XMLMapperBuilder(inputStream, configuration, resource, configuration.getSqlFragments());
// 注册扫描到的接口
mapperParser.parse();
}
} else if (resource == null && url != null && mapperClass == null) {
// 3.使用url

ErrorContext.instance().resource(url);
try(InputStream inputStream = Resources.getUrlAsStream(url)){
XMLMapperBuilder mapperParser = new XMLMapperBuilder(inputStream, configuration, url, configuration.getSqlFragments());
// 注册扫描到的接口
mapperParser.parse();
}
} else if (resource == null && url == null && mapperClass != null) {
// 4.使用class

Class<?> mapperInterface = Resources.classForName(mapperClass);
// 注册扫描到的接口
configuration.addMapper(mapperInterface);
} else {
throw new BuilderException("A mapper element may only specify a url, resource or class, but not more than one.");
}
}
}
}
}

2.MapperRegistry

MapperRegistry类在Configuration中。当我们使用addMapper()addMappers()将一个映射文件或者多个映射文件接口添加到配置的时候,最终配置会添加到Configuration中一个MapperRegistry实例里。

他存放了接口与其对应的映射文件的各种信息,当接口和通过映射文件生产的实现类代理通常一起添加到注册表中时,也就完成了绑定

MapperRegistry内部维护了一个以 Mapper 接口的类作为 key ,接口实现类工厂——暂时先这么理解——作为的 value 的 HashMap 集合 knownMappers,一个代理工厂中可以生产接口中的所有方法实现:

1
private final Map<Class<?>, MapperProxyFactory<?>> knownMappers = new HashMap<>();

当我们想将一个 package 下的所有 Mapper 接口添加到 knownMappers中时,会调用 MapperRegistry.addMappers()

1
2
3
4
5
6
7
8
9
10
11
public void addMappers(String packageName, Class<?> superType) {
ResolverUtil<Class<?>> resolverUtil = new ResolverUtil<>();
// 扫描指定包下的所有类,并将属于superType的类保留下来
resolverUtil.find(new ResolverUtil.IsA(superType), packageName);
// 获取类集合
Set<Class<? extends Class<?>>> mapperSet = resolverUtil.getClasses();
// 遍历集合并将类加入knownMappers
for (Class<?> mapperClass : mapperSet) {
addMapper(mapperClass);
}
}

通过ResolverUtil工具类获取指定包下的所有接口类后,遍历并调用——实际上直接添加单个接口类也是调用这个——addMapper(Class<T> type)方法将之一个一个的添加到knownMappers

1
2
3
4
5
6
7
8
9
10
11
12
13
14
15
16
17
18
19
20
21
22
23
24
public <T> void addMapper(Class<T> type) {
// 判断是否为接口
if (type.isInterface()) {
// 判断这个Mapper接口是否已经加入了knownMappers
if (hasMapper(type)) {
throw new BindingException("Type " + type + " is already known to the MapperRegistry.");
}
boolean loadCompleted = false;
try {

knownMappers.put(type, new MapperProxyFactory<>(type));
// 解析映射文件
MapperAnnotationBuilder parser = new MapperAnnotationBuilder(config, type);
// 添加相关配置
parser.parse();
loadCompleted = true;
} finally {
// 如果因为异常导致加载失败,则移除已经载入的接口
if (!loadCompleted) {
knownMappers.remove(type);
}
}
}
}

这里又涉及到了两个类:MapperProxyFactory<>MapperAnnotationBuilder,这两个类都与 Mapper 接口生成实现类有关:

  • 前者负责通过代理创建接口实现类;
  • 后者扫描代码中的注解并且加载 XXXMapper.xml 的映射文件。

后者在下文就会讲到,前者将在实现类部分的文章细说。总而言之,至此所有 Xml 文件中指定的 Mapper 接口都加载完毕了。

二、映射文件的解析

image-20210619202948385

1.标签与对象之间的关系

我们以最简单的映射文件配置为例:

1
2
3
4
5
6
7
8
<mapper namespace="com.huang.read.base.PersonDao">
<select id="selectByPrimaryKey" parameterType="java.lang.Integer" resultMap="BaseResultMap">
select
id, `name`
from Person
where id = #{id,jdbcType=INTEGER}
</select>
</mapper>
  • 接口Mapper:一个映射文件对应,也就是 <mapper></mapper>对应一个 Mapper 接口类,以namespace作为唯一标识;
  • 方法声明MappedStatement:一个完整的方法配置块——比如上面的 <select></select> ——对应的 Mybatis 的一个 MappedStatement
  • 绑定 SQL BoundSql:一段方法声明中的 sql 片段对应 Mybatis 的一个BoundSql

所有的映射文件最终都会被解析为上述三个对象。

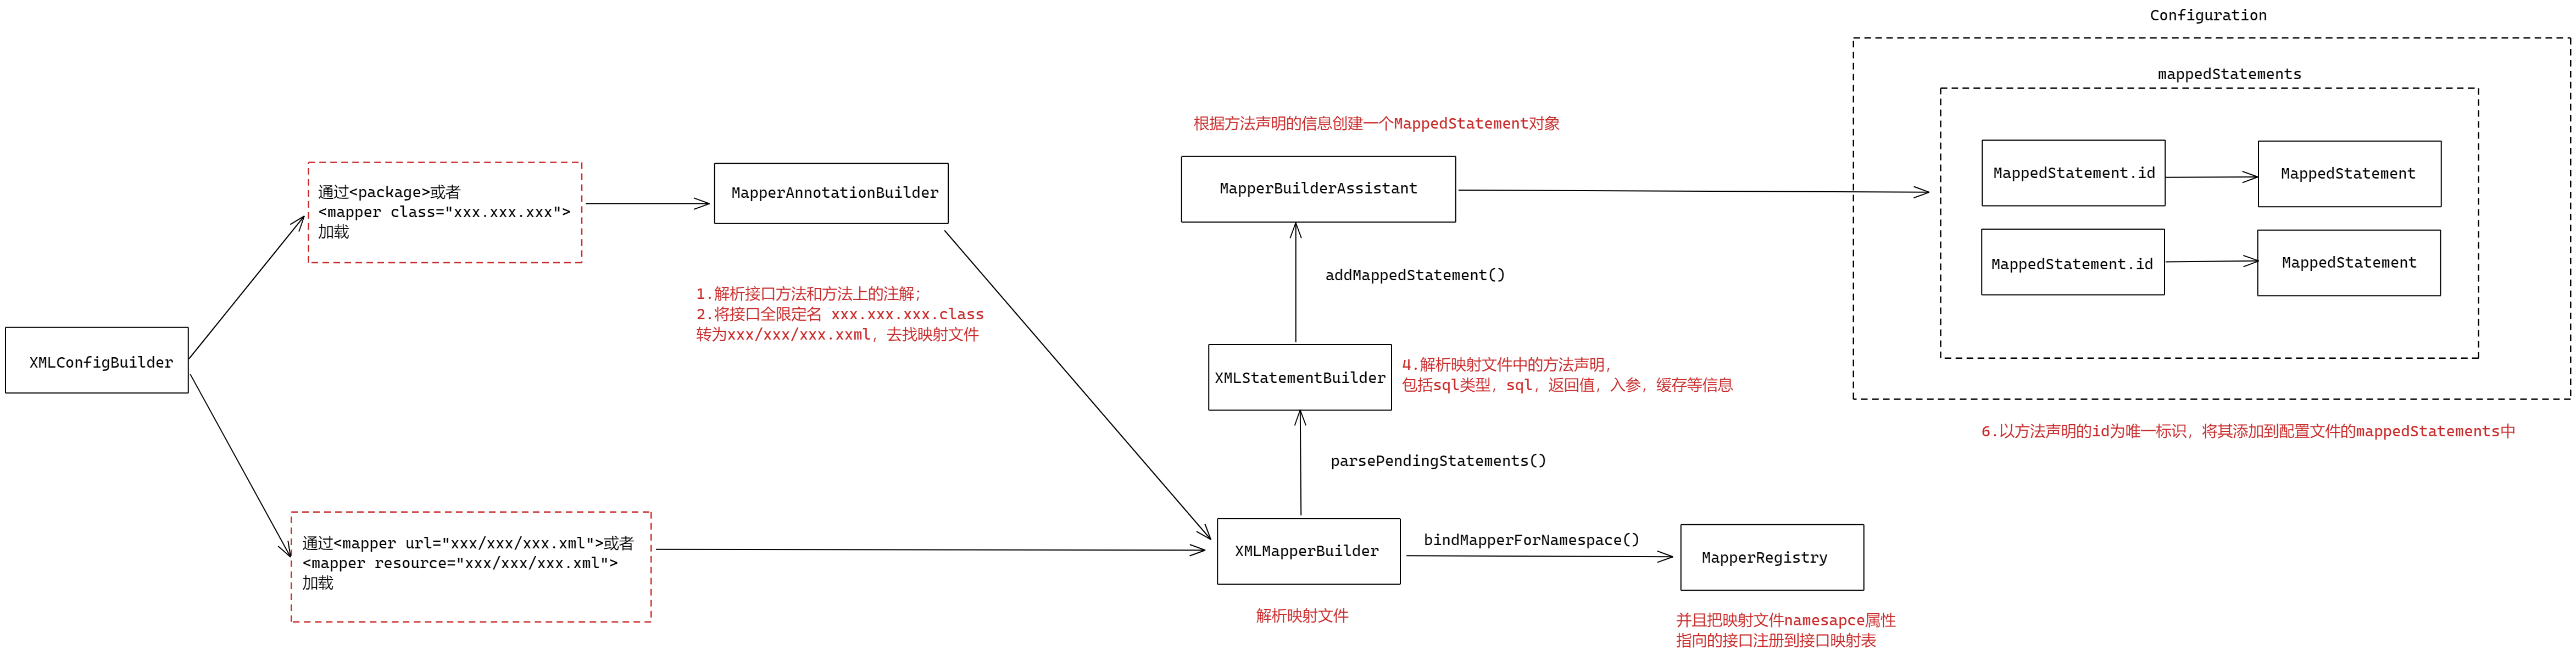
2.MapperAnnotationBuilder

只有 package 或者 class 的配置方式才会进入这个类,否则像 url 或者 resources 会直接从 XMLMapperBuilder 开始。

MapperAnnotationBuilder这个类虽然听名是解析注解的,其实由于 mybaits 支持@Select这样注解式的 sql ,因此解析映射文件与绑定接口也被放在这里一起处理。

我们先看看他的构造方法:

1
2
3
4
5
6
7
8
9
10
public MapperAnnotationBuilder(Configuration configuration, Class<?> type) {
// 将 xx.xx.xx 格式转为 xx/xx/xx.java (best guess) 格式
String resource = type.getName().replace('.', '/') + ".java (best guess)";
// 生成Mapper构建辅助类
this.assistant = new MapperBuilderAssistant(configuration, resource);
// 设置全局配置类
this.configuration = configuration;
// 设置类型为当前接口类型
this.type = type;
}

MapperBuilderAssistant这个类主要作用是解析映射文件中的标签,并将创建为对应的对象,这里我们暂时不过多研究,了解作用即可。

接着是入口方法parse(),这也是一个扫描配置项-初始化为配置类的一次性过程:

1
2
3
4
// 加载所有映射文件及相关注解
MapperAnnotationBuilder parser = new MapperAnnotationBuilder(config, type);
// 转为配置文件
parser.parse();

完成初始化后,调用parse()方法将配置信息存入配置类:

1
2
3
4
5
6
7
8
9
10
11
12
13
14
15
16
17
18
19
20
21
22
23
24
25
26
27
28
29
30
31
32
33
34
35
public void parse() {
String resource = type.toString();
// 防止重复加载
if (!configuration.isResourceLoaded(resource)) {
// 加载映射文件信息
loadXmlResource();
configuration.addLoadedResource(resource);
// 设置映射文件与接口对应的Namespace
assistant.setCurrentNamespace(type.getName());

// 加载二级缓存配置信息
parseCache();
parseCacheRef();

// 遍历接口中的方法
for (Method method : type.getMethods()) {
// 检查该方法是没有对应的sql
if (!canHaveStatement(method)) {
continue;
}
// 获取方法上的注解
if (getAnnotationWrapper(method, false, Select.class, SelectProvider.class).isPresent()
&& method.getAnnotation(ResultMap.class) == null) {
parseResultMap(method);
}
try {
// 将statement添加到配置
parseStatement(method);
} catch (IncompleteElementException e) {
configuration.addIncompleteMethod(new MethodResolver(this, method));
}
}
}
parsePendingMethods();
}

由于 Mybatis 的缓存与注解不影响主体逻辑,因此这里暂时先忽略。

3.XMLMapperBuilder

元素文件与接口的绑定主要逻辑在于loadXmlResource()方法:

1
2
3
4
5
6
7
8
9
10
11
12
13
14
15
16
17
18
19
20
21
22
23
24
25
26
private void loadXmlResource() {
// Spring may not know the real resource name so we check a flag
// to prevent loading again a resource twice
// this flag is set at XMLMapperBuilder#bindMapperForNamespace

// 是否已经被加载过
if (!configuration.isResourceLoaded("namespace:" + type.getName())) {
// 将 xxx.xxx.xxx 的接口全限定名替换为 xxx/xxx/xxx.xml,获取对应的xml文件
String xmlResource = type.getName().replace('.', '/') + ".xml";
// 如果 xxx/xxx/xxx.xml 不行,换成 /xxx/xxx/xxx.xml 再试试
InputStream inputStream = type.getResourceAsStream("/" + xmlResource);
if (inputStream == null) {
// Search XML mapper that is not in the module but in the classpath.
try {
// 如果加载不到,就通过相对路径找
inputStream = Resources.getResourceAsStream(type.getClassLoader(), xmlResource);
} catch (IOException e2) {
// ignore, resource is not required
}
}
if (inputStream != null) {
XMLMapperBuilder xmlParser = new XMLMapperBuilder(inputStream, assistant.getConfiguration(), xmlResource, configuration.getSqlFragments(), type.getName());
xmlParser.parse();
}
}
}

这里的 XMLMapperBuilder实际上跟 XMLConfigBuilder作用类似,最后也是通过 XPathParser 工具类去解析 Xml 文件,只不过XMLMapperBuilder解析的是映射文件而不是配置文件。

我们查看它的入口方法 parse()

1
2
3
4
5
6
7
8
9
10
11
12
13
14
15
16
17
18
public void parse() {
// 检查配置文件是否被加载过
if (!configuration.isResourceLoaded(resource)) {
// 解析根节点mapper标签,然后标记为已解析
// 注意,方法声明在这一步进行解析
configurationElement(parser.evalNode("/mapper"));
configuration.addLoadedResource(resource);
// 解析映射文件,并且绑定到接口对应的Namespace
bindMapperForNamespace();
}

// 解析ResultMap
parsePendingResultMaps();
// 解析二级缓存
parsePendingCacheRefs();
// 转为Mapper中的方法声明
parsePendingStatements();
}

4.bindMapperForNamespace 方法

parse()里调用了 bindMapperForNamespace() 方法,这里根据映射文件的 namespace 属性把映射文件与接口绑定起来了:

1
2
3
4
5
6
7
8
9
10
11
12
13
14
15
16
17
18
19
20
21
private void bindMapperForNamespace() {
// 获取配置文件中的namespace属性
String namespace = builderAssistant.getCurrentNamespace();
if (namespace != null) {
Class<?> boundType = null;
try {
// 根据配置文件找到接口类
boundType = Resources.classForName(namespace);
} catch (ClassNotFoundException e) {
// ignore, bound type is not required
}
// 如果这个接口类还未加载过,则加载进全局配置类的映射注册表MapperRegistry中
if (boundType != null && !configuration.hasMapper(boundType)) {
// Spring may not know the real resource name so we set a flag
// to prevent loading again this resource from the mapper interface
// look at MapperAnnotationBuilder#loadXmlResource
configuration.addLoadedResource("namespace:" + namespace);
configuration.addMapper(boundType);
}
}
}

这里的 addMapper()方法其实还是要往 MapperRegister里面注册接口。也就是说同一个接口实际上可能会被注册两次,在 XMLConfigBuildermapperElement()里注册一次,在现在 XMLMapperBuilderbindMapperForNamespace()里面再注册一次,这也是为什么第二次注册需要检查接口是否重复注册的原因了。

5.parsePendingStatements 方法

映射文件里的标签声明的 sql 方法在XMLMapperBuilder.parse()中的parsePendingStatements()方法被解析对应的 statement 对象:

1
2
3
4
5
6
7
8
9
10
11
12
13
14
15
16
private void parsePendingStatements() {
// 获取所有映射文件中的方法声明
Collection<XMLStatementBuilder> incompleteStatements = configuration.getIncompleteStatements();
synchronized (incompleteStatements) {
Iterator<XMLStatementBuilder> iter = incompleteStatements.iterator();
while (iter.hasNext()) {
try {
// 遍历并转换为Statement对象
iter.next().parseStatementNode();
iter.remove();
} catch (IncompleteElementException e) {
// Statement is still missing a resource...
}
}
}
}

对应的转换方法为:

1
2
3
4
5
6
7
8
9
10
11
12
13
14
15
16
17
18
19
20
21
22
23
24
25
26
27
28
29
30
31
32
33
34
35
36
37
38
39
40
41
42
43
44
45
46
47
48
49
50
51
52
53
54
55
56
57
58
59
60
61
62
63
64
65
66
67
68
69
70
71
72
73
74
75
76
77
78
79
80
81
82
83
public class XMLStatementBuilder extends BaseBuilder {
public void parseStatementNode() {
// 获得 id 属性
String id = context.getStringAttribute("id");
String databaseId = context.getStringAttribute("databaseId");

if (!databaseIdMatchesCurrent(id, databaseId, this.requiredDatabaseId)) {
return;
}

String nodeName = context.getNode().getNodeName();
// 判断sql类型(select,insert,update,delete)
SqlCommandType sqlCommandType = SqlCommandType.valueOf(nodeName.toUpperCase(Locale.ENGLISH));
// 是否为select语句
boolean isSelect = sqlCommandType == SqlCommandType.SELECT;
// 如果不是select,是否清空缓存
boolean flushCache = context.getBooleanAttribute("flushCache", !isSelect);
// 如果是select,是否使用缓存
boolean useCache = context.getBooleanAttribute("useCache", isSelect);
boolean resultOrdered = context.getBooleanAttribute("resultOrdered", false);

// Include Fragments before parsing
XMLIncludeTransformer includeParser = new XMLIncludeTransformer(configuration, builderAssistant);
// 将<include />转换对应的<sql />节点
includeParser.applyIncludes(context.getNode());

// 获取参数类型名称并转为对应java类型
String parameterType = context.getStringAttribute("parameterType");
Class<?> parameterTypeClass = resolveClass(parameterType);

// 获得对应驱动脚本
String lang = context.getStringAttribute("lang");
LanguageDriver langDriver = getLanguageDriver(lang);

// Parse selectKey after includes and remove them.
// 将<selectKey />解析成selectKeyGenerator生成器
processSelectKeyNodes(id, parameterTypeClass, langDriver);

// Parse the SQL (pre: <selectKey> and <include> were parsed and removed)
KeyGenerator keyGenerator;
String keyStatementId = id + SelectKeyGenerator.SELECT_KEY_SUFFIX;
keyStatementId = builderAssistant.applyCurrentNamespace(keyStatementId, true);

if (configuration.hasKeyGenerator(keyStatementId)) {
// 如果上面存在<selectKey />子节点,则获取上面对其解析后生成的selectKeyGenerator
keyGenerator = configuration.getKeyGenerator(keyStatementId);
} else {
// 如果配置了useGeneratedKeys并且为insert语句,就使用Jdbc3KeyGenerator
keyGenerator = context.getBooleanAttribute("useGeneratedKeys",
configuration.isUseGeneratedKeys() && SqlCommandType.INSERT.equals(sqlCommandType))
? Jdbc3KeyGenerator.INSTANCE
: NoKeyGenerator.INSTANCE;
}

// 创建对应的 SqlSource 对象,保存了该节点下 SQL 相关信息
SqlSource sqlSource = langDriver.createSqlSource(configuration, context, parameterTypeClass);
// 获得statement类型,默认为PREPARED
StatementType statementType = StatementType.valueOf(context.getStringAttribute("statementType", StatementType.PREPARED.toString()));
Integer fetchSize = context.getIntAttribute("fetchSize");
Integer timeout = context.getIntAttribute("timeout");

// 获取入参与返回值类型
String parameterMap = context.getStringAttribute("parameterMap");
String resultType = context.getStringAttribute("resultType");
Class<?> resultTypeClass = resolveClass(resultType);
String resultMap = context.getStringAttribute("resultMap");
String resultSetType = context.getStringAttribute("resultSetType");
ResultSetType resultSetTypeEnum = resolveResultSetType(resultSetType);
if (resultSetTypeEnum == null) {
resultSetTypeEnum = configuration.getDefaultResultSetType();
}

// 获取useGeneratedKeys需要的相关属性
String keyProperty = context.getStringAttribute("keyProperty");
String keyColumn = context.getStringAttribute("keyColumn");
String resultSets = context.getStringAttribute("resultSets");

// 根据以上信息生成一个MappedStatement对象
builderAssistant.addMappedStatement(id, sqlSource, statementType, sqlCommandType, fetchSize, timeout,
parameterMap, parameterTypeClass, resultMap, resultTypeClass, resultSetTypeEnum, flushCache, useCache,
resultOrdered, keyGenerator, keyProperty, keyColumn, databaseId, langDriver, resultSets);
}
}

关于方法声明标签中一些属性的具体作用,可以参考Mybatis源码之美:3.7.深入了解select元素

接着,在 MapperBuilderAssistant.addMappedStatement()中,经过一系列的处理:

1
2
3
4
5
6
7
8
9
10
11
12
13
14
15
16
17
18
19
20
21
22
23
24
25
26
27
28
29
30
31
32
33
34
35
36
37
38
39
40
41
42
43
44
45
46
47
48
49
50
51
52
53
54
55
56
57
58
public MappedStatement addMappedStatement(
String id,
SqlSource sqlSource,
StatementType statementType,
SqlCommandType sqlCommandType,
Integer fetchSize,
Integer timeout,
String parameterMap,
Class<?> parameterType,
String resultMap,
Class<?> resultType,
ResultSetType resultSetType,
boolean flushCache,
boolean useCache,
boolean resultOrdered,
KeyGenerator keyGenerator,
String keyProperty,
String keyColumn,
String databaseId,
LanguageDriver lang,
String resultSets) {

if (unresolvedCacheRef) {
throw new IncompleteElementException("Cache-ref not yet resolved");
}

id = applyCurrentNamespace(id, false);
boolean isSelect = sqlCommandType == SqlCommandType.SELECT;

// 构建一个MappedStatement
MappedStatement.Builder statementBuilder = new MappedStatement.Builder(configuration, id, sqlSource, sqlCommandType)
.resource(resource)
.fetchSize(fetchSize)
.timeout(timeout)
.statementType(statementType)
.keyGenerator(keyGenerator)
.keyProperty(keyProperty)
.keyColumn(keyColumn)
.databaseId(databaseId)
.lang(lang)
.resultOrdered(resultOrdered)
.resultSets(resultSets)
.resultMaps(getStatementResultMaps(resultMap, resultType, id))
.resultSetType(resultSetType)
.flushCacheRequired(valueOrDefault(flushCache, !isSelect))
.useCache(valueOrDefault(useCache, isSelect))
.cache(currentCache);

ParameterMap statementParameterMap = getStatementParameterMap(parameterMap, parameterType, id);
if (statementParameterMap != null) {
statementBuilder.parameterMap(statementParameterMap);
}

// 加入 Configuration中的
MappedStatement statement = statementBuilder.build();
configuration.addMappedStatement(statement);
return statement;
}

最终生成的MappedStatement会以方法声明的 id 作为标识,加入全局配置类中的 Map 集合mappedStatements中:

1
2
3
4
5
6
7
8
public void addMappedStatement(MappedStatement ms) {
mappedStatements.put(ms.getId(), ms);
}

// StrictMap是一个继承了HashMap的自定义集合,针对Myabtis存放MappedStatement的需求针对方法做了一些调整
protected final Map<String, MappedStatement> mappedStatements = new StrictMap<MappedStatement>("Mapped Statements collection")
.conflictMessageProducer((savedValue, targetValue) ->
". please check " + savedValue.getResource() + " and " + targetValue.getResource());

6.MappedStatement

MappedStatement对应了映射文件中的一个方法声明,每个MappedStatement对象都以 namespace.id的形式区分,里面包含了映射文件中一个方法签名所有必要的数据,包括 sql 对象,映射文件路径,入参和返回值类型等等。

1
2
3
4
5
6
7
8
9
10
11
12
13
14
15
16
17
18
19
20
21
22
23
24
25
26
27
28
29
30
31
32
33
34
35
36
37
38
39
40
41
42
43
44
45
46
47
48
49
50
51
52
53
54
55
56
57
58
59
60
61
62
63
64
public final class MappedStatement {

// 映射文件路径
private String resource;

// 配置类
private Configuration configuration;

// 方法声明的全限定名 namespace.id
private String id;

// 批量查询行数
private Integer fetchSize;

// 超时时间
private Integer timeout;

// statement类型,有STATEMENT PREPARED CALLABLE三种,分别对应不同的Statement
private StatementType statementType;

// 返回值类型
private ResultSetType resultSetType;

// sql对象获取方法
private SqlSource sqlSource;
// 语言驱动
private LanguageDriver lang;

// 缓存对象
private Cache cache;

// 执行后是否清空缓存
private boolean flushCacheRequired;

// 是否使用缓存
private boolean useCache;

// 入参类型
private ParameterMap parameterMap;

// ResultMap
private List<ResultMap> resultMaps;
// 是否有嵌套的ResultMap
private boolean hasNestedResultMaps;
private boolean resultOrdered;

// sql类型
private SqlCommandType sqlCommandType;

// keuy生成器
private KeyGenerator keyGenerator;
private String[] keyProperties;
private String[] keyColumns;


// 数据库标识
private String databaseId;

// 日志
private Log statementLog;

// 多结果集
private String[] resultSets;
}

三、关于接口与映射文件关系的思考

1.先加载接口还是映射文件?

关于这个问题,我们回头看看 XMLConfigBuilder 里的 mapperElement(),其实就能理明白接口与映射文件的加载顺序。

首先,Myabtis 的四种配置方式,其实本质上对应着两种顺序:

  • 先找接口,再根据接口全限定名找映射文件<package><mapper class="xxx.xxx.xxx">
  • 先找映射文件,再根据 namespace 找接口<mapper url="xxx/xxx/xxx.xml"><mapper resource="xxx/xxx/xxx.xml">

先找接口

  1. 直接先在指定位置找到接口类,注册到 MapperRegister里面;

  2. 在此时创建 MapperAnnotationBuilder,解析@Select这样的 sql 标签;

  3. 接着将接口类的全限定名 com.xxx.xxx.class 转成 com/xxx/xxx/xml作为映射文件路径,然后创建 XMLMapperBuilder去根据路径解析映射文件,表现出来的形式就是接口与映射文件需要同包同名;

  4. 解析映射文件的过程中,再根据映射文件的 namespace 属性找接口,试着再注册一次,如果已经注册过就不注册。

    另外需要注意的是,这里如果映射文件的 namespace 跟 MapperAnnotationBuilder的全限定名不一样就会报错。

先找映射文件

  1. 直接根据配置文件路径找到映射文件;
  2. 根据映射文件 namespace 找到并且注册接口。

这里我们就完全明白了:

  • 为什么XMLMapperBuilder解析映射文件注册接口的时候要做重复校验?

    因为根据配置方式的不同,可能在加载映射文件之前接口已经被注册一次了;

  • 为什么 package 和 class 的配置方式需要接口和映射文件同包同名?

    因为加载完接口会直接根据接口全限定名找对应的映射文件;

2.接口可不可以有多个映射文件?

答案是可以,根据上述理论,一个接口是可以有多个映射文件的。

也就是说,如果有一个接口叫 Person.class,里面的 selectOne() 方法在 Person.xml,而 selectList()方法在Person2.xml,而两个映射文件的 namespace 都指向了 Person.class

当我们在配置文件中以 <mapper url="xxx/xxx/xxx.xml"><mapper resource="xxx/xxx/xxx.xml"> 的方式配置它并运行程序,那么实际上 Person.class所有的方法都可以正常调用。

从理论上来说,Person.xmlPerson2.xml的信息最终都会合并到一个 Statement 里头,这两个映射文件除了 <Mapper></Mapper>跟标签外,其他内容都是互通的,在Person.xml配置的 <Sql>或者 <ResultMap> 标签在 Person2.xml中一样可以正常使用。

总结

我们总结一下 Mapper 接口与映射文件的加载过程:

  1. XmlConfigBuilder 解析 <mappers></ mappers>标签,获取要解析的 Mapper 集合

    如果 mapper 是以 package 标签或者 mapper 的 class 属性配置的,就带着配置文件路径直接跳到步骤 4

    如果 mapper 是以 mapper 的 resource 或者 url 属性配置的,就继续步骤 2;

  2. MapperRegister 中注册接口;

  3. 对每一个 Mapper 接口创建一个 MapperAnnotationBuilder,用于解析 @Select这样的 sql 标签

    xxx.xxx.xxx 的接口全限定名转为 xxx/xxx/xxx.xml作为步骤 4 的配置文件路径;

  4. 创建一个 XMLMapperBUilder,并根据配置文件路径找到映射文件并解析;

  5. 调用 bindMapperForNamespace()方法,解析映射文件并获取映射文件的 namespace 属性,找到并将接口注册到 MapperRegister 中;

  6. 调用 parsePendingStatements()方法,解析映射文件的方法声明,然后通过 XMLStatementBuilder转为 MappedStatement

0%